Friday 4 December 2020

Merry Little Christmas ~ A Vintage Journey


Hi everybody! Its time for a new challenge over at A Vintage Journey. Sadly this will be the last time I open my blog post with these words, as this will be the final challenge for this amazing blog. It has been an honour and a pleasure to have been a Creative Guide on the AVJ blog and I will miss my fellow CGs as well as all you lovely people! Now, before I get too sad, let me tell you about our fina,l Christmas themed challenge, we are asking that you....

Celebrate the season by making an ATC or a set of ATCS depicting Christmas scenes or colours. Just remember to create your project in one of our preferred styles: vintage, shabby, mixed media, art journaling, industrial, timeworn or steampunk.

I've had a lot of fun creating these ATC's featuring a little shaker element, peeping through a marbled background. This is how I got started......
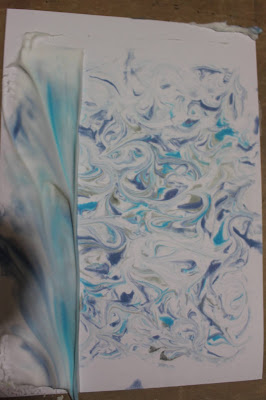
Firstly, I squirted a layer of shaving into a shallow tray and smoothed the surface with a metal squeegee. A large palette knife would also do the trick. Bear in mind that it has to be shaving foam for this technique. Shaving gel will not work.
I then unscrewed the tops on several of my Distress Oxide Spays, and used the spray tube to apply drops of the oxide ink onto the surface of the shaving foam.
I used the end of a paintbrush to swirl and mingle the colours.
I then placed a piece of 300gsm card onto the surface of the shaving foam, lightly pressing it down to ensure that the whole of the surface was in contact with the shaving foam. I then gently peeled it off. at this stage, it looked as though all the swirls had disappeared. The magic really starts to happen when the shaving foam is scraped off the surface....
I used the metal squeegee to remove the shaving foam and reveal the lovely marbled patterns. I made several pieces .......
I used Distress Oxides in Mermaid Lagoon, Iced Spruce and Faded Jeans. Different effects can be achieved by changing the amounts of colour you apply.
The official size for an ATC is 2.5 x 3.5 inches or 64 mm x 89mm. I used an old Tim Holtz Bigz Die to cut out my ATCs and before long I had a nice little pile to play with.
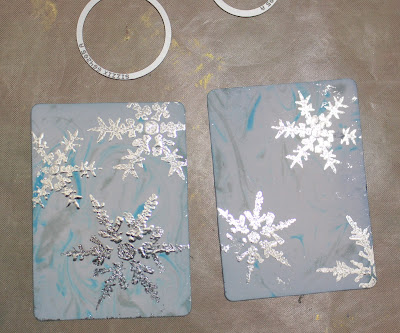
Now, with all this lockdown business, I've found myself spending way too much time with the TV crafting channels on. Obviously, this has lead to my acquiring a few new crafty items,(as if I need any!) One of them, however, is a fairly inexpensive, laminator specifically used for foiling. I have to say, I'm quite taken with it. I used it to apply silver foil to these stenciled snowflakes. In this instance, I stenciled with Collage Medium and left it to dry. I then applied the foil and ran it through the laminator, I rather like the effects, as the collage medium created a bit of texture. A note of caution though, I left some to dry overnight, and tried foiling them the next morning. The Collage Medium did not take up the foil quite as well as when it was left for a shorter time.
I used the circle die that came with the Sizzix Tiny Domes, to cut a circle in my ATC. I then Tim Holtz's Christmas Circle Words to cut out the words, 'hope' and 'Joy', from silver craft card. I also cut an ATC out of  Idea-ology Kraft Cardstock in blue. Before I adhered all of the layers, I added some tiny glitter stars to the small  dome. 
And just like that my final challenge project was finished. We would love you to join us for this last challenge, as usual our top three will be posted to our winners Pinterest Board, on Dec31st. Pease hop over to the AVJ blog where you will find lots of inspiration from the brilliant Creative Guides. We have also all made an extra ATC to say goodbye to all you lovely people who have supported our challenges and enjoyed reading the A Vintage Journey blog, Thank you so much, we will all miss you! I'd also like to thank Brenda and all of the Creative guides for letting me share this fantastic journey! I shall endeavour to keep my Artistic Craft Dabbler going, so I hope to see you over here very soon ! 
Have a wonderful, if different Christmas and very best wishes to you for a happy and healthy 2021 xxx
Here is my ATC for our 'good bye theme' on the A Vintage Journey blog x

Friday 6 November 2020

Pairs Trios and Sets ~ A Vintage Journey ~ New Challenge


Hi everybody! I am the lucky host for our  new challenge over on the A Vintage Journey blog. It's called Pairs Trios and Sets. Here are the details......
For this month's challenge we would like to see you create a set that works together. It could be ATCs, tags, triptyches, or any other grouping. Just remember to create your project in one of our preferred styles: vintage, shabby, mixed media, art journaling, industrial, timeworn or steampunk.
I'm sure you'll agree that there's plenty of scope for creativity here. I've made a trio of shaker decorations. I shall be sharing a tutorial on how to make them, on the A Vintage Journey blog in  a couple of weeks time. In the meantime, here are a few pictures to keep you going....

I must apologise for the quality of my pics, it was very difficult to capture the detail, with the light bouncing of the shiny surface .......
and finally......

I hope you'll join us over on the A Vintage Journey blog. The Creative Guides have provided some wonderful inspiration for you. You can access the blog with this link I look forward to seeing you there. In the meantime stay happy and healthy. That's an order ! x


Friday 30 October 2020

A Vintage Journey ~ Tag Friday


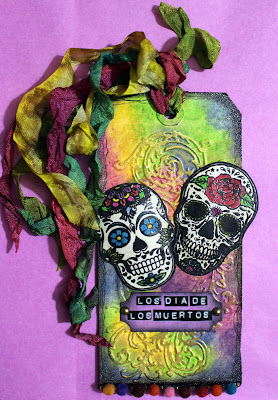
Hi everybody! it's Tag Friday over on the A Vintage Journey blog, and that means that we Creative Guides, get to have a lot of old school fun! Ever since Tim Holtz Started his annual Twelve Tags Challenges, many years ago, tag making has become an art in it's self. By hopping over to the A Vintage Journey blog and seeing the Creative Guides beautiful selection of tags, you'll understand exactly what I mean! I've chosen a 'Day of the Dead' theme for my tag. The festival of Los Dia De Los Muertos, occurs on the 2nd of November, and celebrates both life and death. Sugar skulls are an important part of the celebrations. They may represent departed loved ones and are also used as offerings for the departed to enjoy when they return home.
I coloured the background of my tag with Distress Crayons. I really like these but have found that I haven't really used them enough. I created patches of each colour, and then lightly spritzed the surface, I then blended the colours with my finger, applying more of each colour to add depth. I then used my heat gun to dry the surface and finally, used a soft cloth to buff up the colour. This added a slight sheen. 
I then used a Tim Holtz flourish embossing folder to add texture to the tag. I highlighted the pattern by rubbing gilding wax into the raised surface. I also used Black Soot Distress ink around the edges and heat embossed with clear embossing powder, applied lightly.
I stamped out the sugar skulls with black Versa Mark Ink and heat embossed them. I used felt pens to colour in the flowers and applied a little Antique Linen Distress ink to tone down the very white surface......
 I used a ball tool with a  foam mat to add dimension to the sugar skulls, before adhering to the tag.
To finish off I added a Dymo label ' Los Dia De Los Muertos' translated as The Day of The Dead and an extravagant bunch of Distress Ink dyed ribbons. I also found a cute piece of bobbly braid in my ribbon stash and attached this to the bottom of the tag. I hope my colourful tag reflects some of the joyousness of the festival, which is as much about the living, as it is about our cherished and dearly departed loved ones. 
If you would like to see what the other Creative Guides have been up to for our Tag Friday, hop over to the A Vintage Journey blog with this link, grab a cuppa and enjoy !


Friday 4 September 2020

Cogs, Gears and Textures ~ A Vintage Journey ~ New Challenge

Hi everybody! It's time for a new challenge over at A Vintage Journey.  Our lovely host this month is our very talented, Creative Guide, Ann. This is what she has to say.......

"Cogs, Gears and Textures"
Let us see you create amazing textures on your cogs and gears. Embossing powders, pastes, rusting or gilding waxes, acrylics ..... whatever your imagination suggests. Just remember to create your project in one of our preferred styles: vintage, shabby, mixed media, art journaling, industrial, timeworn or steampunk.

Well! I don't think there are many mixed media lovers who don't like texture as well as a cog or two! As you can see I certainly do.  My project is an altered door sign........
The door sign is something I bought a while ago, thinking it would be a good base for altering. The cogs are laser cut MDF shapes. I started by using my favourite Tim holtz, Layering Stencil, with Grunge Paste to add some texture to the sign. I didn't bother putting gesso on first as the wooden surface was quite smooth with a matte finish. Whilst this was drying, I painted the cogs with black texture paint from a 'Rusty Patina' set, by Imagination Crafts. Once they were dry, I set about creating a rusty finish on them. Firstly, I splodged on patches of the rust coloured paint from the set, and added some splashes of teal here and there.
When these layers of paint were dry, I added patches of Seth Apter's Chunky Rust, embossing powder. I then painted the door sign with the same black texture paint....
 I then used  metallic Treasure Gold Pastes, to highlight the raised patterns. I also used a pewter coloured gilding paste, on some of the cogs. My hands were pretty messy by this stage, so I'm afraid I didn't capture any pictures but here's a close up of a finished section....
It was fun playing with different arrangements of cogs, before adhering them with a glue gun. The finishing touches were to add different brads to the centres of the cogs, as well as an altered Word Chip, declaring  'Salvaged'. I really love creating faux finishes with rusty metallics, being one of my favourites. So it's many thanks to our Creative Guide Ann, for choosing a challenge that has enabled me to indulge my passion! If you would like to follow me and indulge your passion for cogs, gears and textures, please come and join us over on the A Vintage Journey blog. You'll find some fantastic inspiring projects by Ann and the other Creative Guides, as well as all the details of how to get involved. I hope to see you there! 


Friday 3 July 2020

Water Colour Wonders ~ A Vintage Journey ~ New Challenge

Hi everybody! I hope you are all doing well in these unusual times. We have a fabulous new challenge over on the A Vintage Journey blog, set by our very talented Creative Guide, Deb. This is what she has to say about it.........
This month we want to see what can you create with water reactive mediums. There are lots of options - watercolour paints, dye inks that react with water, or any of those wonderful powders that bloom to life when sprinkled onto a wet surface. Just remember to create your project in one of our preferred styles: vintage, shabby, mixed media, art journaling, industrial, timeworn or steampunk.
I always welcome a challenge that gives me an opportunity to use some of my lovely supplies, that tend to get forgotten about. Deb's challenge has done just that, enter Pixie Powder's, Brushos and Watercolour pens.........
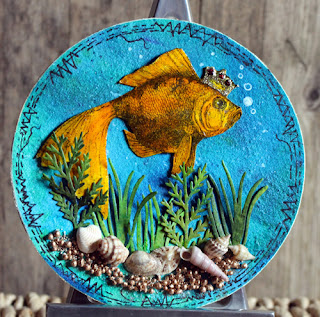
Ha ha! there doesn't look like much to see in this picture, but look closely and you will see some little specks of Brusho powders, sprinkled over this piece of watercolour paper. I used Prussian Blue and Cobalt Blue. I also puffed on a little Peacock Green Pixie Powder. I then spritzed the surface with water to activate the powders. Unfortunately I didn't take a photo but trust me the powders mingled together to create a lovely, watery background. Once the paper was dry, I adhered it to a cork mat......
I left it to dry and then used a sanding block to remove the surplus paper. To 'frame' my scene, I used a black fine tipped pen, and created a faux stitched border..........
I then looked through my stash of left over coloured papers, in order to find something suitable to die cut a few fronds of sea weed. I found two pieces of  watercolour paper that I'd previously coloured with Distress Spray Inks. These are my 'go to' products for adding colour to almost any craft project. There are many colour sprays out there, and I have acquired several different brands over the years, but I always reach for my Distress Sprays.......
I used a couple of Dies from Tim Holtz's Funky Florals dies, I also added a spritz of DI Spray to tone the colour down slightly........

I also adhered a sprinkling of Art Stones, to anchor the plants. I coloured the stones with a solution of Ancient Copper Pixie powder. One of the lovely things about powdered mediums such as Brushos, Pixie powders and of course Paperartsy Infusions, is that as well as sprinkling the dry powders to create different effects, you can also mix them with a little in water and use them with a paint brush or dip pen. I then turned my attention to the star of my little  sea scene. I used one of my 'lockdown' purchases, a gorgeous regal fish stamp from La Blanche. I stamped 'her' with black Archival Ink, and coloured her with Zig Watercolour Pens. I then cut around the fish and used a ball tool to add dimension.......
To add an extra touch of bling, I used some glitter Stickles to decorate her crown. All that remained was to assemble my underwater scene. I remembered that I had a few small shells and when I found them they were just the job for a finishing touch........
If you would like to have a little fun with your water reactive mediums, we would love to see what you come up with. Hop over to the A Vintage Journey blog and you'll find all the details of how to get involved. You will also find Deb's gorgeous project as well as some wonderfully, inspirational projects, by our Creative Guides. Just click on this link and you will be transported straight there! Happy Creating !x

Friday 5 June 2020

Rustic Charm ~ A Vintage Journey ~ New Challenge

Hi everybody! We have a new challenge over on the A Vintage Journey Blog. Astrid is our fabulous host and she has called the challenge 'Rustic Charm'. This is what Astrid has to say about it.......

Rustic describes a design that is natural, rough, aged and casual. We would love to see you create a project using these elements: think nature inspired textures and simple and earthy colours.  Just remember to create your project in one of our preferred styles: vintage, shabby, mixed media, art journaling, industrial, timeworn or steampunk.

I'm sure you'll agree that there is something for everyone with this challenge ! If you hop over to the AVJ blog with this link you will see Astrid's gorgeous project, as well as a fantastic array of inspiring projects by the other Creative Guides. My project is a little, rustic style, notebook  because of course, you can never have too many note books! 

I started by stripping off some of the facing, from a piece of card board. I had to persevere as it seemed to be well glued on!
I also cut two pieces of card for the covers measuring 6 x 4 inches and covered each side with papersfrom Tim Holtz Wild Flower Paper Stash. I also used a palette knife, to add crackle medium, to my piece of corrugated card.........
I spritzed the crackled cardboard, with Antique linen Distress Spray, and sprinkled on some Paper Artsy Infusions. This gave a nice mottled finish and added a little more texture. I then adhered the card board to the front cover.......
 
.......and  wrapped a length of  vintage copper wire around the middle. I also punched holes into the top of each cover and added metal eyelets. I used a standard hole punch to mark the position of the holes, then punched them out, using a Cropodile. I was then able to use the hole punch to make corresponding holes in my papers.
The bird was die cut using Tim Holtz's Feathered Friends Die. One of my 'lock down' acquisitions ! I used cork fabric, which I must say cut very easily. I used alcohol inks to colour the individual pieces but left the wing in it's natural colour. Once assembled, I adhered it to the front cover. I used a paper cutter to cut the notebook papers to a size which is slightly small than the cover. I punched holes in the top of each page and assembled the notebook using ring binders. Here is a view of the inside........
To finish off, I added a tim Holtz chip board Quote Chip, and four faux rusty nails, these are little plastic embellishments, that hve been heat embossed with Distress Embossing powder. They did slightly melt, as I was heating them !  
Well, this was an enjoyable project to make and now I have yet another useful notebook to add to my collection or maybe this one will be given as a gift. If you fancy having some fun with rustic finishes, then please come and join us over on the A Vintage Journey Blog. We would love to see your projects that have a distinctive 'Rustic Charm'  x


Friday 1 May 2020

Beautiful Blooms ~ A Vintage Journey ~ New Challenge

H everybody! I hope you are all staying safe and well. It's  the beginning of a new month, which means it's time for another challenge over at A Vintage Journey. Jennie is our lovely host this month and she has chosen a fabulous challenge, which she has called, 'Beautiful Blooms'. If you hop over to the AVJ blog, you'll find Jennie's beautiful work as well some beautiful and inspiring projects from the other Creative Guides. This is what Jennie has to say about the challenge........
'Flowers are a perennial favourite for most of us, so this month we would love to see your beautiful blooms showcased on your project. You might choose to use a die cut, stamps, readymade, homemade or pressed flowers .... a single flower or a whole bouquet. Just remember to create your project in one of our preferred styles: vintage, shabby, mixed media, art journaling, industrial, timeworn or steampunk.'
My project is an altered canvas bag, embellished with felt, die cut flowers. This is how it came together.......
I started with a plain canvas bag measuring around 25cm or 10 inches across by 20cm or 8 inches deep......
 I put masking tape on the handles to prevent the Distress Ink from spreading onto them. as Distress inks are water reactive, I thought it would be better to treat the handles with something more waterproof.......
Once the bag was dry, I gave it a coat of gloss gel medium which has helped to seal the colours. I also painted the handles with diluted acrylic paint. After more Drying time, I used a variety of Imagination Crafts, Starlight paints, with an Art By Marlene, stencil to create a subtle pattern on the surface........
I've always been interested in textiles and many years ago, I bought an embellishing machine. It looks like a sewing machine, but has 7 barbed needles and doesn't need threading. The needles perform in the same way as a felting needle tool, but because there are several all acting together, the process of felting fibres is much faster. There are several videos on You tube showing embellishers in action. I created the flowers by laying down several layers of wool roving, and running the resulting swatch, under the embellisher, until it matted together and created a piece of felt. The resulting felt, is much more substantial than the usual craft felt. After creating several pieces of felt, I used my Tattered Florals die to cut out the flower shapes. I also used my Tattered Leaves die, to cut some leaves in various shades of green. Before attaching the flowers, I decided to add a lining to the inside of the bag. I also found a length of upholstery braid, that was a great match and a few studded gems that were the right colours.  The great thing about mixed media  textiles projects is that you can break all the rules. nobody is going to check your seams and you can use a glue gun! 
Here's a view of the lining and the braid which I applied with my glue gun. I also used it to attach the flowers. Here's a close up of one of my 'flower auditions' before they were glued down......
I'm really pleased with the way the bag has worked out. It's just the right size to hold a few crafty materials, or maybe some knitting or embroidery items.
I hope you've enjoyed seeing my canvas bag evolve. If you'd like to join in with our Beautiful Blooms challenge, please hop over to the A Vintage Journey blog with this link, where you'll find the challenge guidelines as well as plenty of inspiration from the Creative Guides. We'd all love to see your creations. x